Archive | Recipe RSS feed for this section

You say tomato, I say pizza!

18 Jul

If your summer is going anything like mine, you have a lot of tomatoes hanging around.  And while I enjoy tomato sandwiches on most afternoons, I have been trying to use tomatoes in practically everything I eat!002
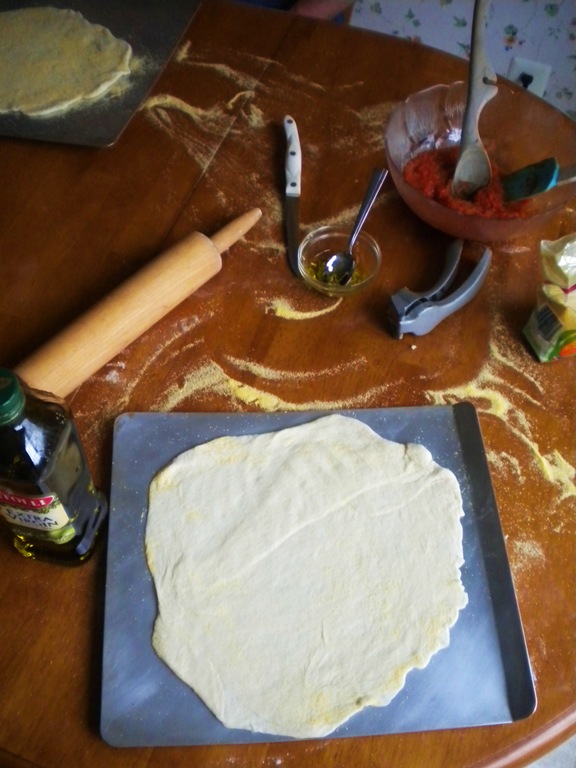
Another one of my summer addictions? Pizza! I’m not sure if it is because it is so simple to eat or because I can make it however I like, but pizza has been a staple in my diet and I’m not complaining.  So instead of buying another jar of pizza sauce I decided to dive right in and make my own!
You will need:
•5-6 medium tomatoes
•1 garlic clove
•1 TBS olive oil
•A handful of fresh basil
•1/2 cup onion
1.) Begin by marking each tomato with two slits to make an “X” and then steam tomatoes.  This may be the hardest part and I promise it isn’t hard.  The steam will begin to peel the skin off where you made then X.  Once the skin begins to peel, remove from water and allow to cool.
2.) Next, chop the onion.  You don’t need to make perfect pieces because you will throw it in the food processor later.
3.) Heat your oil and sauté the onion on medium heat.  While your onion is cooking, cut each tomato and remove seeds and excess juice.  I also allowed the tomatoes to sit in a bowl so the juice would drip out and would not make my sauce watery.
4.) Then add the garlic and cook for a few seconds so you do not burn it.  Add tomatoes and basil and simmer for 10-15 minutes.  This allows the flavors to start intensifying.
5.) I then put the sauce in the food processor for about 30 seconds.  I didn’t want it to get too thin because I wanted a thick pizza sauce.  I then allowed the sauce to cook for a good half hour until it was nice and thick.
6.) Remove from heat and use on your pizza!  This recipe made enough for 2 personal size pizzas so I used one portion and then froze the other half.

016

021 029

033035

040

The sauce turned out really well and I was happy with both the flavor and the consistency. Now if only I could bottle the sauce for pizza year round!

Artichoke, something green. Happy Birthday, SWEET SIXTEEN!

7 Jul

Happy Sweet 16 to my cousin Margaux – a fun, beautiful and brilliant girl.  It is hard to believe that I can actually remember her being born and celebrating her first birthday when today it doesn’t feel like we are that many years  apart.
Our love of clothing, makeup, photography and of course, cooking, is what brings us together.  Whenever we get together we swap favorite makeup brands, latest finds and what’s cookin’ .
There is one recipe in particular that Margaux has been begging me to cook, post and share with her:
Artichoke Dip
Preheat oven to 350
You will need:
•14 oz. artichokes in water
•1/2 cup light mayo
•1/2 cup sour cream
•1/8 tsp. Tabasco Sauce
•1/3  cup grated parmesan cheese
1.) Begin by draining artichokes and finely chopping. 
2.) Next, add the remaining ingredients and stir thoroughly.
055
3.) Bake for 20-25 minutes until bubbly around the edges and the dip begins to brown on top.

As you can see this recipe is simple but the results are so delicious.   The sweet, tender artichoke hearts melt perfectly into the creamy dip that pairs well with crackers or  bread.  It is a recipe that you can whip up if company is coming unexpectedly or if it is just simply your 16th Birthday.
Happy Birthday Margaux, here’s to many, many more.

Simple ingredients: Artichokes

2 Jun

You aren’t aware that something is unusual until someone else declares it is.
Growing up, my family’s rituals and eating habits were the only way that I knew.  Drinking iced tea each night with dinner was what everyone else did.  And eating elbow noodles with butter and parmesan cheese was and still is, breakfast.
It was my Dad’s birthday and I gushed to my cousin Brian that we were having crab legs to celebrate.  Sweet, juicy crab legs that my Dad would crack open for me and pull out all the tender meat that I’d dunk in a pool of rich butter.  The concerned look on Brian’s face confused me.  Did he not enjoy crab legs?  That night as I stood on my chair, reaching for another leg, Old Bay seasoning dripping down my arms, I proclaimed, “Brian doesn’t believe me! I eat crabs!”
I was five.  And the pivotal moment when I realized that no, everyone does not eat the same thing.  While food does not define who we are, it helps tell our story.  Food allows us to express our memories, culture and tradition.
Artichokes are a food that even as an adult, seem unusual to others.  They are a versatile vegetable and unique in every way.  So when I pull out a container that holds an artichoke, I tend to get some looks.
My first memories of eating an artichoke is at my Grandmother’s house.  The bright green leaves, stuffed with aromatic bread crumbs and cheese filled up orange rimmed ceramic bowls.  Sometimes she would squeeze lemon juice over the leaves for an added sensorial experience.  As I pulled each leaf between my teeth, the stack of “clean” leaves became higher and higher until it was time to eat the heart.  If you have ever ate a fresh artichoke you understand how treasured the heart is.  It is the softest part of the artichoke, located in the middle under the thick leaves, thin leaves, and hairy fibers.  And like any heart, it is worth protecting.  Its meat is sweet and soft.  With a little touch of salt, the heart is perfectly seasoned and a treat worth eating your way to.

Here is my simple rendition of a family favorite and treasured food.
1.) Begin by thoroughly washing the artichoke.
2.) Use a knife or kitchen scissors to  snip the tops of the leaves.

3.) Slice off the top portion of the artichoke, exposing the leaves.  Slice the bottom of the artichoke stem so that it is about 2 inches long and flat on the bottom.

4.) There are many methods of cooking the artichoke but the one I like best is simply steaming them.  If you have a steamer that would make the process that much easier, but I simply put the artichoke in a ramekin so that it is steady and not submerged in the water.

5.) The next part can be controversial but you can use whichever method works best for you.  I take about 1/4 cup Italian bread crumbs, a few TBS parmesan cheese, salt and peppers and mix together.  I then spread the leaves and sprinkle the mixture in.  Lastly, I drizzle the artichoke with some extra virgin olive oil.  The oil will add a ton of flavor and make it taste extra special.  Simmer the water before adding the artichoke.  I make sure the water does not surpass the top of the ramekin and cover the pot with a lid so that it can steam properly.  Allow to steam for 45-60 minutes or until leaves are tender enough to pull off.
6.) To remove, use tongs because it will be very hot.  Place in a bowl and make sure you have a spare bowl for the leaves.

To eat:  Begin by grabbing a leaf off of the artichoke.  The bottom of the leaf will be the thinner part.  Bite down on the top of leaf, making sure to eat the bread crumb mixture and scrape the artichoke meat off of the leaf by pulling the leaf through your teeth from top to bottom.  Continue to do this for each leaf.  As you get closer to the heart the leaves will become more soft and easier to eat.
For the heart, remove any remaining leaves.  Use a spoon to scrape out fuzzy parts.  Cut the heart up in pieces (because everyone will want a try) sprinkle a little salt on, and enjoy.
And while I can’t promise that you will love artichokes, though I can’t see why not, I think they are definitely worth trying.  You never know what may become a part of your food story.  And before you know it, your children will be eating artichokes  at dinner thinking that everyone else in the world is doing the exact same thing.

Spinach & Bacon Salad

27 May

Whether you’re barbecuing, relaxing or working this Memorial Day weekend, one thing is for sure… this weekend kicks off summer eating!  Ok, so maybe you already started eating caprese salads and fresh watermelon, I am guilty  too.  But, prior to this weekend it wasn’t official.
I  have a salad for you that will make you the star of any barbecue, work picnic or family reunion.  It is simple, fresh, and an explosion of flavor with each bite!
Strawberry Spinach Salad
You will need:
For salad:
•2 bags of baby spinach
•1 pint of strawberries, sliced
•3/4 pound of grapes, cut in halves
•1 pound of bacon, cooked and crumbled
For dressing:
•1 cup olive oil
•1 cup sugar
•1/2 cup wine vinegar
•1 tsp salt
•1 tsp minced onion
•1 tsp worcestershire sauce
The hardest part of this recipe is just prepping everything.  Make sure  you wash your spinach well and dry it even better.  Mix together the ingredients for the dressing well.  The dressing will tend to separate so make sure you keep stirring.  Combine all of the salad components and you’re finished!
I always serve the dressing on the side because it will become extremely soggy if you put it over the salad ahead of time.  And if you have vegetarians you can obviously put the bacon on the side as well.  Feel free to substitute  the bacon for turkey bacon too!
And you might want to print this recipe out because everyone is going to  want it.  Oh, and you might as well get used to making it because not only will your friends and family be asking you to make it…but you’ll probably have a stash of it waiting in your fridge all summer long.  Yup, it  is that good.
And if you haven’t entered my GIVEAWAY yet, make sure you do!

Hey Tyson Grilled & Ready

14 May

Dear Tyson® Grilled & Ready®,
Ever since I was asked by the Foodbuzz Tastemaker program if I wanted to try your products, I became a little curious. Of course I wanted to try! I was really excited when I was sent a coupon to purchase either chicken or steak products and I quickly began dreaming of delicious things I’d create. Pasta, sandwiches, salads…my creativity was working overtime. But then it came to me. Create my favorite part of a meal…an appetizer!
So here is my creation. I hope you like what I’ve done with you. I’m not too worried because everyone raved about how delicious you tasted!

Grilled Chicken Artichoke Pepper Crostini
Yields: 30 appetizer bites
Preheat oven to 350°
You will need:
•1 baguette
•4 TBS EVOO
•¼ cup light mayo
•6 oz. of roasted red peppers
•6 oz. of quartered artichoke hearts
•About 10 strips of chicken
•1 yellow onion
1.) Begin by slicing the baguette in thin slices. I had around 30 pieces. Place them on a baking sheet and drizzle EVOO on bread. Bake for 12 minutes or until crispy.

2.) Meanwhile, combine mayo and roasted red peppers in a food processor. Make sure the peppers are dried well to prevent the spread from becoming too runny. Taste to make sure there is a good balance between the ingredients. Next, add the artichoke hearts. Cover and refrigerate until ready to assemble crostini.

3.) Put chicken in a sauce pan until evenly heated. While the chicken is getting ready, slice the onion into thin rings. Sautee onions with cooking spray and remove once they are golden brown and soft.

4.) To assemble, begin by taking a piece of the bread, adding enough of the pepper spread to evenly coat, top with half of a chicken strip, then the onions.

So, Tyson® Grilled & Ready®, what do you think? I love how easy you are to prepare and that you are 98% fat-free and contain no preservatives. Not to mention that I could have eaten all of the Grilled Chicken Artichoke Pepper Crostini! My only complaint? I wish you had been around when I was in college!